In the previous post in this series, we talked about how user
applications can use the system call ioctl() after opening a file that’s
usually called /dev/dri/card0 to drive the graphics card and draw things on
the screen.
We did not yet draw anything on the screen, we only talked to the driver and got some information on the current version:
❯ ./drm-part-1
i915
Intel Graphics
1.6.0
Intel Specific
From now on we will have to use intel specific commands since we have an intel card, so unfortunatly almost nothing from here applies to other cards, except the general concepts - which are actually very important: you can easily learn specifics if you know how the whole thing is supposed to work.
New Includes
First thing, lets include string.h because it is useful for memory
manipulation, which we will need when we start sending images and other kinds of
buffers (commands, mainly) to the graphics card.
#include <cstring>
And now lets include the actual header files for libdrm for some quality of
live improvements versus directly sending structs to the kernel using ioctl().
And while we are at it, lets include the libraries specific to intel cards and
our intel driver too.
// libdrm
#include <xf86drm.h>
#include <xf86drmMode.h>
// intel-specific memory management & commands
#include <libdrm/intel_bufmgr.h>
#include <libdrm/i915_drm.h>
Now lets create the same functionality as we did previously but using the
higher-level libdrm functions! But first, lets update our print_version()
definition:
void print_version(const drmVersionPtr version) {
    std::cout << std::string(version->name, version->name_len) << std::endl
              << std::string(version->desc, version->desc_len) << std::endl
              << version->version_major << "."
              << version->version_minor << "."
              << version->version_patchlevel << std::endl;
}
the only difference is that now we are taking a drmVersionPtr in instead of a
drm_version_t&, which also implies converting . acessors to -> ones.
And now lets create the function which will do the same thing as we were doing,
fetch_and_print_driver_version:
void fetch_and_print_driver_version(const int gpu) {
    // Let libdrm handle the ioctl()s
    drmVersionPtr version = drmGetVersion(gpu);
    drmVersionPtr lib_version = drmGetLibVersion(gpu);

    std::cout << "Driver:" << std::endl;
    print_version(version);
    std::cout << "Lib:" << std::endl;
    print_version(lib_version);

    // Free memory
    drmFreeVersion(version);
    drmFreeVersion(lib_version);
}
Setting the screen resolution
Now we are going to jump into new territory. We are going to set the mode that the graphics card will opperate in, which is essentially setting the screen resolution. We also have a new way of opening the graphics card file:
// There is a drmOpenMinor function in libdrm for which no Bus ID is needed
// but it is not exposed :/
const int gpu = drmOpen(nullptr, "pci:0000:00:02.0");
for that we need the Bus ID, which we can find with lspci in the shell:
❯ lspci
...
00:02.0 VGA compatible controller: Intel Corporation Skylake GT2 [HD Graphics 520] (rev 07)
...
or we can also find in the journalctl logs the part where the kernel detects the
graphics card:
❯ journalctl -k -b 0 | grep VGA
Jan 24 18:47:37 corona kernel: pci 0000:00:02.0: vgaarb: setting as boot VGA device
...
After opening the file, we also need to initialize the intel memory manager, which will manage buffers in the graphics card for us.
auto bufmgr = drm_intel_bufmgr_gem_init(gpu, 32);
KMS - Kernel Mode Setting
KMS, or Kernel Mode Setting is, as mentioned above, more or less setting the screen resolution. In reality we are setting a mode, which is not just the screen resolution, but all other related configurations in the card: bit depth, margins etc.
There are four main structures involved in KMS: resources, connectors, encoders and crtcs.
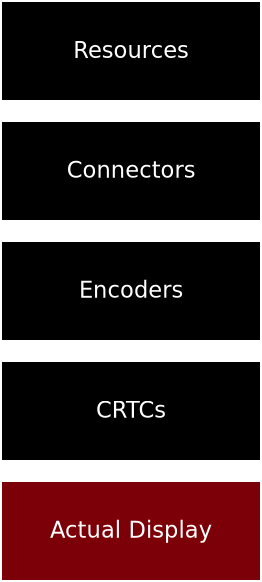
What actually does the “mode setting” and sets the display configurations is
setting the Cathode Ray Tube Controller (CRTC, I know, this should be
refactored at this point…) mode with drmModeSetCrtc() but to get it we need
to get the resources, connectors and encoders to finally find our CRTC.
// Get the resources
const drmModeResPtr res = drmModeGetResources(gpu);

// Get each connector -> encoder -> crtc
for (size_t c=0;c<res->count_connectors;c++) {
    auto connector = drmModeGetConnector(gpu, res->connectors[c]);
    auto encoder = drmModeGetEncoder(gpu, connector->encoder_id);
    auto controller = drmModeGetCrtc(gpu, encoder->crtc_id);

    // Loop through each mode, but actually we will just break after setting the
    // first mode
    for (size_t m=0;m<connector->count_modes;m++) {
        auto width = connector->modes[m].hdisplay;
        auto height = connector->modes[m].vdisplay;

        // Which connectors will we be using?
        uint32_t connector_ids[] = {connector->connector_id};
        uint32_t tiling_mode = I915_TILING_NONE;
        // RGBA, 1 byte each, so each line is 4 x width
        uint64_t pitch = 4*width;
        // bo, "Buffer Object": our framebuffer
        auto bo = drm_intel_bo_alloc_tiled(bufmgr, "screen",
                                           width, height, 4,
                                           &tiling_mode, &pitch,
                                           0);
        // ... fill the bo with something cool ...

        uint32_t buf_id;
        // Add the BO we just created as a framebuffer (FB)
        assert(drmModeAddFB(gpu, width, height, 24, 32, pitch, bo->handle, &buf_id) == 0);

        // THIS is the actual mode setting! Everything else is here just to
        // support this call!
        assert(drmModeSetCrtc(gpu,
                              controller->crtc_id,  // crtc
                              buf_id,               // framebuffer
                              0, 0,
                              connector_ids, 1,     // connectors
                              &connector->modes[m]) // mode
               == 0);
        //

        drm_intel_bo_unreference(bo);

        drmModeFreeCrtc(controller);
        drmModeFreeEncoder(encoder);

        break;
    }

    drmModeFreeConnector(connector);

    break;
}

drmModeFreeResources(res);
And that’s it! That’s what you need to actually display something in the screen:
- get the resources;
- choose one connector;
- get the encoder and controller for it;
- choose one of its supported modes;
- allocate a framebuffer;
- set the mode!
In the actual source I added a cool little function called
fill_with_little_squares() which fills the framebuffer with little squares
before sending to the GPU so you can actually see something:
void fill_with_little_squares(drm_intel_bo *bo, size_t width, size_t height) {
    drm_intel_bo_map(bo, 1);
    for (size_t i=0;i<width*height*4;i+=1) {
        auto x = (i/4/16)%width;
        auto y = i/(4*16*width);
        static_cast<uint8_t*>(bo->virt)[i] = (x+y)%2 ? 0 : 255;
    }
    drm_intel_bo_unmap(bo);
}
Do a little compilling linking against libdrm and libdrm_intel…
❯ clang++ drm-part-2.cpp -o drm-part-2 -I/usr/include/libdrm/ -ldrm -ldrm_intel
And when we run this is what we get:
❯ ./drm-part-2
We did it! Displaying images on the screen without X11!
In the next part we will talk about actually sending commands to the GPU to make it draw for us.